8- Parking
Parking – part one
Goal: Teach your teen to master angle and perpendicular parking.
Location: Start in large, level, mostly empty areas. You will need angled and perpendicular spaces.
Before your teen starts parking practice, review “Skill three: How close are you?”
and “Skill four: Backing up.”
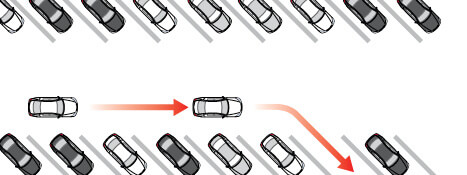
Lesson one – angle parking
The slight turn makes this the easiest type of parking for new drivers.
Hint: Choosing a parking spot on the left side of the car can provide more room to maneuver
and a better view of traffic when backing out.
Turn when the front of your vehicle reaches the edge of the space. Stay alert for cars backing out to leave their space.
- Signal to indicate intent to turn into
a parking space. - Move forward until the steering wheel is aligned with the first pavement line marking the space.
- Look at the middle of the parking space and turn the wheel sharply at a slow, controlled speed.
- Steer toward the center of the space, straightening the wheel upon entry.
- Stop when the front bumper is six inches
from the curb or from the end of the space. - After you’ve parked, put the gear in park for automatic transmissions (for manual transmissions, put the car either in first or reverse) and set the parking brake. Shut off the ignition and remove the key. Check for traffic prior to getting out. Lock the doors.
Lesson two – perpendicular parking
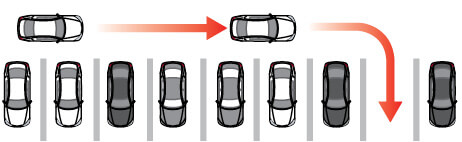
Turn when your outside mirror reaches the edge of the space. Always finish with your wheels straight and your car centered in the space.
The steps are the same as for angle parking, but the sharper turn into perpendicular spaces may require more practice.
Lesson three – exiting spaces
- With a foot on the brake, shift into reverse, which will signal that you will be backing up.
- Before moving, search all around your vehicle using your mirrors, backup camera, and looking over your shoulder side-to-side and behind.
- For angled spaces, back up straight until the driver’s seat is even with the bumper of the next vehicle on the turning side. For perpendicular spaces, back up straight until the windshield is aligned with the bumper of the next vehicle.
- Quickly turn the wheel in the direction that the rear of the car needs to go.
- Glance forward to make sure the front bumper is clear of the car on the other side.
- When the front bumper clears the other vehicle, stop, shift into drive, and pull forward to
complete the exit.
Practice, practice, practice!
Parking – part two
Goal: Teach your teen to master parallel parking.
Location: A street with marked parallel parking spaces at a time of day when traffic is light.
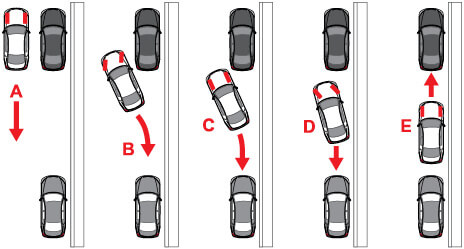
Lesson one – parallel parking
Parallel parking is a difficult maneuver for new drivers, so patience is key. Many drivers never learn to do it well, especially in areas where it’s not common. Because of the difficulty of learning parallel parking, and because there are several different teaching methods, this skill is sometimes best taught by a professional driving instructor. Assess your own parallel parking skills and your teen’s abilities before beginning.
Start by practicing with cones before graduating to practicing alongside vehicles.
- Select an available space on the
passenger’s side of the car. - Signal when approaching the space and check mirrors for traffic behind the vehicle.
- Move forward past the space until lined up directly parallel to the car parked in front, 2–5 feet away. Being too close or too far
away will make parking more difficult. - With a foot on the brake, shift to reverse
and turn around to check for traffic and
make sure the travel path is clear. - Release the brake, start backing up slowly, and start to make an “S” turn, turning first right and then left.
- Glance both forward and backward repeatedly to check the space around the car while turning.
- Once the rear of the car is mostly in the space, start turning in the other direction to straighten out.
- Adjust the vehicle’s position as needed to center it in the space.
- Check to see if the wheels are 6–12 inches from the curb. If not, pull out and try again.
- Always check for passing vehicles and cyclists before you open your door.
Lesson two – exiting a parallel parking space
- With a foot on the brake, shift to reverse, turn around, and back as close as possible to the vehicle behind you.
- Check your side mirror and look over your shoulder for cyclists or fast-moving cars, then signal and shift into drive.
- Make sure the travel path is clear, then move slowly forward while steering rapidly out of the space.
Lesson three – parallel parking on a hill
Parallel parking on a decline with a curb: Position the vehicle close to the curb and stop. Let the vehicle creep forward while turning the wheel right, letting the tire wedge itself against the curb. Shift to park and set the parking brake. Without a curb: Follow the same procedure, but there will be no curb to wedge the tire against.
Parallel parking on an incline with a curb: Pull close to the curb. Before stopping, turn the wheel left, and let the vehicle roll back until the right front wheel wedges against the curb. Without a curb: Pull as far off the road as possible, turn the wheel right, shift to park and set the parking brake.