10- Multi-Lane Roads
Multi-lane roads – part one
Goal: Teach your teen to drive safely and with confidence on busier, more complex, multi-lane roads.
Location: A busier, multi-lane road. When beginning, choose a time with limited traffic, such as a weekend morning.
Skill review
By now, your teen should be comfortable driving on quiet roads. Before starting multi-lane road practice, it’s important to review some key information from previous lessons. The following skills are crucial to safe driving on busier, more complicated roads.
Lesson one – mirror positioning, monitoring and blind spots
Refer to Skills One and Two. Clearly seeing the adjacent traffic is especially important on multi-lane roads. Remind your teen to check the mirror positions when entering the car, and to constantly monitor the traffic around them.
Lesson two – stopping distance
Refer to Skill Six. Remind your teen that when stopping their vehicle behind another one, they should be far enough back to see where the other car’s tires meet the road.
Lesson three – following distance
Refer to Skill Six. Review the three-second rule with your teen, emphasizing that increasing following distance is the single best way to reduce crash risk. This gives the driver visibility, time, and space to avoid crashes.
Lesson four – safe lane changing
Changing lanes in a vehicle that has large blind areas is difficult and often dangerous. It requires a “blind spot check” (looking over the shoulder) to verify there is a large enough of a gap to move in to.
The technique used for a safe lane change is S.M.O.G:
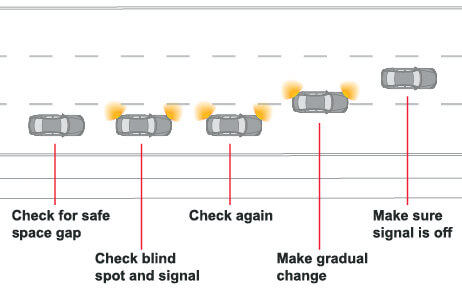
When changing lanes, always recheck traffic with a glance over the shoulder at the blind spot.
- Signal – Let others know your intention
- Mirror check – Inside mirror then outside mirror
- Over your shoulder – Look to check blind spot
- Go if it is clear – Change lanes and cancel signal
Have your teen practice these lane change steps until proficient:
- Check traffic to the rear and the sides for an appropriate gap.
- Signal to indicate intention to change lanes.
- Recheck traffic, including a glance over the shoulder at the mirror blind spot area.
- Maintain speed or accelerate slightly before and during the lane change.
- Gradually move in to the new lane.
- Adjust following distance, using the three-second rule.
Other road users
Multi-lane roads – part two
Goal: Teach your teen to drive safely and with confidence on busier, more complex, multi-lane roads.
Location: A busier, multi-lane road. When beginning, choose a time with limited traffic, such as a weekend morning.
Lesson one – right turns
Start with right turns, which are fairly simple. Right turns are always made from the right lane of the current road to the first, open lane of the new road. Look for signs and signals that indicate whether “right on red” is allowed. Practice right turns until you feel confident that your teen is proficient.
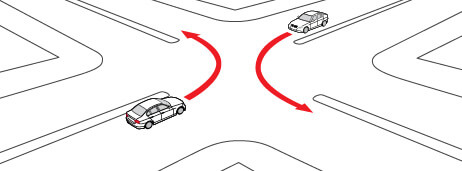
Lesson two – left turns
Left turns should almost always begin and end in the closest lane to the right of the yellow line. The yellow line in the lane being turned into should be your teen’s target. There are three types of left turns:
- Protected left turns with a designated left turn lane and left turn signal
- Semi-protected left turns made from a center or shared turn lane
- Unprotected left turns made from an active travel lane
Protected left turns should be made from the designated lane when the left turn signal displays
a green arrow, using the yellow line in the lane being turned into as the steering target.
For unprotected left turns, coach your teen on these steps:
- Make sure the vehicle is in the correct lane to make a left turn.
- Signal the turn and begin slowing down at least 100 feet from the intersection.
- Move carefully in to the intersection. Don’t turn the wheel until you’re ready to make the turn.
- Yield to any vehicles, bicycles, or pedestrians.
- When there is sufficient space with no oncoming traffic, move ahead in to the turn.
- Choose a steering path line in the middle of the closest lane to the right of the yellow line.
Lesson three – safe passing procedures
Discourage your teen from passing other cars unnecessarily. If passing is necessary, the following
steps should be observed:
- Position your vehicle more than three seconds behind the vehicle to be passed.
- Check mirrors and blind spots for traffic behind you.
- Check the oncoming travel ahead to make sure there’s plenty of space before you try to pass.
- Signal intent to pass and accelerate quickly to match the speed of traffic flow.
- While passing, monitor the space in front of and behind your vehicle and check the rearview mirror
for the front of the car being passed. Make sure to not exceed the speed limit when passing. - When you see the front of the passed car in the rearview mirror and your vehicle is well clear, signal intent, gently and slowly move back to the original lane, cancel the signal, and maintain speed.
Don’t turn the wheel until you’re ready to make the turn.