8- Parking
Parking – part one
Goal: Teach your teen to master angle and perpendicular parking.
Location: Start in large, level, mostly empty areas. You will need angled and perpendicular spaces.
Before your teen starts parking practice, review “Skill three: How close are you?”
and “Skill four: Backing”.
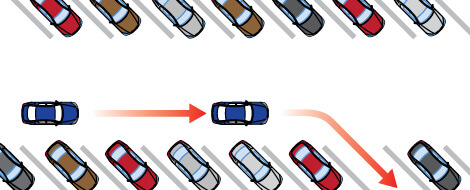
Lesson one – angle parking
Hint: Choosing a parking spot on the left side of the car can provide more room to maneuver and a better view of traffic when backing out. Positioning your vehicle further away from the spaces before starting to turn into the spaces will allow for a better final position in both angle and perpendicular parking.
Watch for white back up lights on vehicles that may be backing out of spaces and be prepared to let them exit before you park. They may not see you.
- Signal to indicate intent to turn into a parking space.
- Move forward until the steering wheel is aligned with the first pavement line marking the space.
- Look at the middle of the parking space and turn the wheel sharply at a slow, controlled speed.
- Steer toward the center of the space, straightening the wheel upon entry.
- Stop when the front bumper is six inches
from the curb or from the end of the space. - After you’ve parked, put the gear shift lever in park for automatic transmissions (for manual transmissions, put the car either in first or reverse) and set the parking brake. Shut off the ignition and remove the key. Check for traffic prior to getting out. Lock the doors.
- Suddenly opening car doors can pose a very serious threat to bicyclists. When opening their car door, drivers and passengers should check their rear-view mirror, side-view mirror, then open the door with their far hand.
Lesson two – perpendicular parking
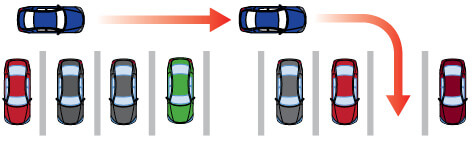
Turn when your outside mirror reaches the edge of the space. Always finish with your wheels straight and your car centered in the space.
The steps are the same as for angle parking, but the sharper turn needed for perpendicular spaces may require more practice. Start turning into the space when you have lined up the front reference point. This will be the pivot point for turning into the space. As with angle parking starting further away from the space allows for a better final position in the space.
Lesson three – exiting parking spaces
- With a foot on the brake, shift into reverse, which will signal that you will be backing.
- Before moving, search all around your vehicle using your mirrors, backup camera, and looking over your shoulder side-to-side and behind.
- For angled spaces, back straight until the driver’s seat is even with the bumper of the next vehicle on the turning side. For perpendicular spaces, back straight until the windshield is aligned with the bumper of the next vehicle.
- Look rear and quickly turn the wheel in the direction that the rear of the car needs to go.
- Glance forward to make sure the front bumper is clear of the car on the other side.
- When the front bumper clears the other vehicle, stop, shift into drive, check the blind spots for vehicles, and pull forward to complete the exit.
Practice, practice, and more practice
Parking – part two
Goal: Teach your teen to master parallel parking.
Location: A street with marked parallel parking spaces at a time of day when traffic is light.
Lesson one – parallel parking
Teens will be required to parallel park for the Vermont skills test. This skill is sometimes best taught by a professional driving instructor. Assess your own parallel parking skills and your teen’s abilities before beginning. There are several methods to accomplish this; all require steering fully right to fully left and looking through the rear window while backing slowly. Finish up by slowly pulling forward to center the vehicle in the space.
- When approaching the parking space on the right, check your rearview mirror and signal right.
- Stop alongside the front vehicle, two to three feet away with back bumpers even, shift to reverse, and turn wheel all the way to the right.
- Check for traffic and pedestrians in all directions.
- Look over your left shoulder to check the blind spot area and let any traffic clear.
- Let vehicle roll slowly until the driver can first see across the back end of the parked vehicle. Your vehicle should be at a 45 degree angle at this point. Stop and straighten the wheel. Check for traffic.
- Proceed to let the vehicle roll slowly backward, with wheels straight, until the front bumper clears the rear bumper of the car ahead. The taillight of the vehicle you are parking behind should be visible in the right lower windshield area of your vehicle.
- Stop and turn the wheel all the way to the left, checking for front bumper clearance, and then looking to the rear over the right shoulder, and let the vehicle roll slowly into a straight vehicle position.
- Pull ahead to adjust vehicle’s position to be centered in the space.
- The vehicle’s wheels should be within 12” of the curb or edge of the street.
Lesson two – exiting a parallel parking space
- With right foot on the brake, shift to reverse, look to the rear, and back (with wheels straight) to a spot where re-entry into traffic can be made in one motion.
- Shift to drive and turn wheels all the way to the left and signal left.
- Check your side mirror and look over your shoulder for cyclists or fast-moving cars, then pedestrians and bicyclists in all directions, including the blind spot over the left shoulder.
- Ease out of the space while checking for front bumper clearance on the vehicle ahead.
Lesson three – parallel parking on a hill
Make sure the vehicle is in park and the parking brake is properly engaged. To prevent the vehicle from rolling into traffic, instruct your teen to turn the front wheels as follows:
- Toward the curb when parking downhill
- Away from the curb when parking uphill
If there is no curb, have your teen point the wheel so that the car would roll away from traffic if it moved.