2- Moving, Steering, & Stopping
Moving, steering, and stopping – part one
Goal: Teach your teen to consistently start, stop, and turn smoothly with full vehicle control.
Location: A large, level, mostly empty area.
Everyone in the vehicle must be properly buckled up.
Before starting, coach your teen to always signal and check mirrors and blind spots before changing the speed, position, or direction of the car. Remind them when needed.
Have your teen drive around the perimeter of the lot several times at a slow speed. Have them stop and start frequently, practicing smooth hand-to-hand steering, braking, and accelerating.
Pick several targets in the large, level, empty practice area, and have your teen drive to them at specific speeds. For example, “Drive to the stop sign at 15 mph.” Focus on steady speed and smooth starts and stops.
Once your teen is braking smoothly, practice “hard, smooth stops” at slightly higher speeds (approximately 25–30 mph). Hint: Curling toes back just before braking results in smoother stops. It eases the pressure on the brake.
Lesson one – steps toward turning
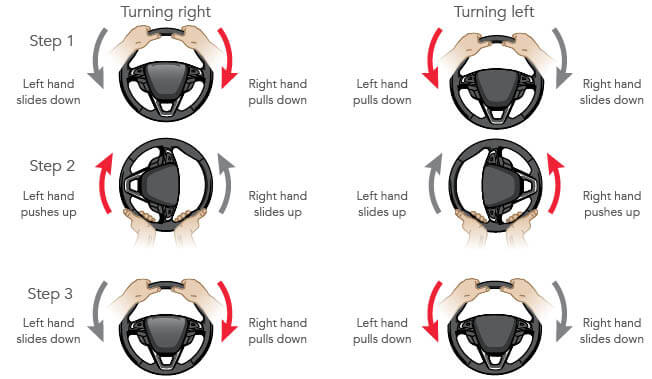
With hand-to-hand steering your hands do not cross each other, staying clear of the air bag.
Lesson two – turning techniques
- Ease off the accelerator or use the brake to reduce speed before entering a curve; use gentle acceleration to overcome inertia and pull the vehicle out of the curve.
- Use smooth, continuous steering wheel movements when approaching a turn and when returning (sliding) the wheel through the hands until the vehicle is in the proper post-turn position.
- Coach your teen to pick a target well ahead near the center of the intended travel path. This target can be used as a visual aid to aim at while steering through turns.
Controlling speed
Moving, steering, and stopping – part two
Goal: Teach your teen to safely stop and start on a hill without rolling back.
Location: A quiet road or area that has a hill.
When you take your skills test, the examiner will have you stop and start on a hill. You will be instructed to drive to the right side of the road, stop, and then set your parking/emergency brake and shift to neutral.
When you’ve chosen a safe and quiet location for this skill, coach your teen to signal right as you drive up the hill to tell others what you are doing. Drive to the right side of the road, stop, and then set your parking/emergency brake and shift to neutral. The parking/emergency brake will keep the vehicle from rolling back.
Before continuing up the hill, put the vehicle in gear. Signal left, then check your mirrors and left blind spot to be sure that traffic is clear. Accelerate gently until you feel the vehicle start to move and then release the parking brake, and look over your left shoulder once again before driving out. You will be able to drive up the hill without rolling back. Some vehicles have parking brakes that will automatically release when you accelerate. These vehicles will make this skill easy for you as you will have one less step to perform.
Note: You may need to stop on a hill for a stop sign, traffic light, or emergency such as a dog or person running into the street. To prevent a rollback when starting on a hill, a driver can use any of these following techniques:
- Quickly move your foot from the brake to the gas.
- Set your parking/emergency brake. Move your right foot to the gas. Apply the gas lightly and carefully release the parking/emergency brake to continue up the hill.
Note: When driving downhill, you should never coast with the clutch to the floor or the gearshift in neutral.