
Introduction
Teenage & Adult Driver Responsibility Act (TADRA)
The Teenage and Adult Driver Responsibility Act (TADRA) was enacted on July 1, 1997. TADRA established a graduated driver’s license program for young drivers ages 15 to 18 in Georgia. This act directly addresses the leading killer of our young people – traffic crashes. The law significantly changes the way young motorists earn and maintain the privilege of driving by providing a controlled means for new drivers to gain experience, and by reducing high-risk driving situations. While the law does focus on young drivers, it also contains important provisions that affect drivers over 21, particularly in the area of DUI prevention and enforcement.
TADRA involves an intense, three-step education process that allows the young driver to gain more experience behind the wheel:
Secure Ids
Since July 1, 2012, the DDS has implemented additional procedures to enhance the integrity and security of your Driver’s License (DL) and Identification Card (ID). These procedures require that you bring additional documentation with you when you visit one of our Customer Service Centers.
To assist you with collecting your documents, the DDS has created a Checklist Wizard at the following website that will allow you to print a custom checklist of your documents or you may choose to print the full list of acceptable documents: https://online.dds.ga.gov/SecureID/default.aspx
Step One – Instructional Permit
(Class CP)
Class CP permit fee – $10.00
Payable in cash, money order, check or credit card.
In order to apply for an Instructional (Learner’s) Permit (Class CP), all applicants must meet the following requirements:
- You must be at least 15 years of age.
- Fee must be paid before the test begins.
- You must pass a vision exam and a knowledge exam.
- If you are under 18 years of age, a parent, guardian, or authorized driver training instructor must sign the application for Instructional Permit. The signer also has the authority to request the revocation of the Instructional Permit at any time before your 18th birthday.
- If you are new to Georgia, you must surrender any out of state driver’s license/permit/ID card.
- If you were previously issued a driver’s license/permit in another state, and that card has been lost or stolen, you must provide a certified copy of your motor vehicle report (MVR) from the state that issued the card. The MVR must be dated within the last 30 days. The DDS does not accept uncertified copies printed from websites, but a fax may be sent to the DDS directly from the other state agency.
- If you are under 18 years of age, you must present a notarized Certificate of School Enrollment (DS-1) form from your school signed within the last 30 days, a high school diploma or GED.
- All documents must be in English.
Step Two – Provisional License
(Class D)
Class D license fee – $10.00
Payable in cash, money order, check or credit card.
In order to apply for a Provisional License (Class D) all applicants must meet the following requirements:
- You must be at least 16 years of age.
- You must have held an Instructional Permit (Class CP) for a minimum of one year and a day. Your permit must also be surrendered at the time of testing.
- You must not have been convicted of any traffic violations that prohibit issuance of a Class D.
- You must have completed a minimum of 40 hours of supervised driving experience, 6 hours of which must be at night.
- If 16 years of age, the driver training requirements of Joshua’s Law must be satisfied.
- You must pass a vision exam and road skills test.
- If you are under 18 years of age, a parent/guardian, or authorized driver training instructor must sign the application for the driver’s license. The signer also has the authority to request the revocation of the driver’s license at any time before your 18th birthday.
- If you are new to Georgia, you must surrender any out-of-state driver’s license/permit/ID card.
- If you were previously issued a driver’s license/permit in another state, and that card has been lost or stolen, you must provide a certified copy of your motor vehicle report (MVR) from the state that issued the card. The MVR must be dated within the last 30 days. The DDS does not accept uncertified copies printed from websites, but a fax may be sent to the DDS directly from the other state agency.
- If you are under 18 years of age, you must present a notarized Certificate of School Enrollment (DS-1) form from your school signed within the last 30 days, a high school diploma or GED.
- You must present your ADAP or eADAP certificate of completion.
- If the Parent Teen Driving Guide was used to satisfy the Joshua’s Law “Behind the Wheel” requirement, you must sign the Driving Experience Affidavit (DDS-7) affirming you have a minimum of 40 hours of driving, 6 of which must be at night.
- All documents must be in English.
Class D Provisional License Conditions
- No driving between the hours of 12:00 a.m. and 5:00 a.m. No exceptions.
- During the first six months after issuance, no driving with passengers who are not members of the driver’s immediate family;
- For the second six month period, no driving with more than one passenger under the age of 21 who is not a member of the driver’s immediate family;
- After one year from the date of issuance, no more than three passengers under the age of 21 who are not members of the driver’s immediate family.
The Parents’ Role in the Young Driver’s Licensing Process
- Grant the Department of Driver Services permission to issue their young driver an Instructional Permit and a Class D Driver’s License.
- Provide their teen with at least 40 hours of supervised driving experience, 6 hours of which must be at night.
- Ensure that 16-year-old drivers complete an approved driver education course prior to applying for a Class D license.
- Limit the teen’s driving privileges if he or she is not demonstrating responsible behavior.
- Continue to monitor their teen’s driving after receipt of their provisional license and reinforce safety belt use, passenger restrictions, and hands-free cell phone use.
- Serve as a positive role model by demonstrating safe driving behaviors.
Parent Tips for In-Car Guided Practice Sessions
Parental reinforcement of basic driving skills and good decision-making will lead to safe driving habits that will last a lifetime.
- Enjoy your time together. Have fun! This is a great “bonding” opportunity. Focus on the driving task and leave family issues at home.
- When you drive, set a good example to model. Always wear your safety belt. Try to correct any unsafe driving habits that you may have acquired; such as rolling through stop signs, accelerating through yellow lights, exceeding the speed limit, driving distracted, etc.
- If possible, initial instruction should begin in a car with an automatic transmission so that your teen can focus on mastering basic vehicle control maneuvers.
- Select driving environments that complement the lesson objectives and the novice driver’s ability. Start in parking lots and progress to quiet neighborhoods. Stay in a safe, low-risk environment as long as needed and, in the beginning, practice using driving routes familiar to your teen.
- Check to make sure your teen has their Instructional Permit and insurance information with him or her when operating a vehicle.
- Explain the objectives of each lesson and review what was learned in the last lesson.
- Feedback should be precise and immediate. If a mistake is made, repeat the maneuver, taking the driver step by step through the process, and then allow practice without assistance.
- Be patient, calm, and alert at all times. Make positive remarks frequently.
- Have short, well-planned practice sessions. Thirty minutes is the optimum learning period for beginning drivers. The first 30 minutes of each one-hour session should be used to introduce and practice the new skills. Assess the teen’s understanding of the lesson objectives during the second half of the session. Set high standards and evaluate each driving session together.
- In a parking lot, practice steering the car with your left hand from the passenger seat.
- If you have a car with a parking brake between the seats, practice stopping the car by depressing the release button and raising the parking brake.
- To prepare yourself to regain speed control in the event your teen panics, practice shifting the transmission from drive to neutral from the passenger seat.
- Adjust the mirror on the passenger sun visor so you can use it as a rearview mirror. If the right outside mirror is properly adjusted to eliminate blind spot and glare, you can also use that mirror to monitor traffic to the rear from the passenger seat.
- Keep instructions simple and concise. First direct where to go, and then state the action to take (e.g., “At the next intersection, turn right.”)
- Check mirrors and the space to the sides and ahead of the vehicle before giving directions.
- Emphasize driving with a large anticipation zone by looking at least 15-20 seconds ahead. Think “what if”; what if a car suddenly changes lanes, stops, turns, etc.
- Encourage commentary driving! This is the most valuable tool you have for checking how your teen is using driving skills and evaluating the environment. Ask your teen to “read the traffic picture aloud” describing anything that may affect your path of travel. For example, when your teen changes speed, your teen may say: “red light, mirror, ease foot off accelerator and brake.” Actually, you should hear “mirror and ease off accelerator” a lot!
- Reinforce the fact that a green light means one must scan the intersection before proceeding.
- Encourage your teen not to panic when approached by an emergency vehicle and to focus on looking for a safe area to pull over.
- Discuss the rules for passing a stopped school bus with flashing lights.
- Encourage new drivers to change their route to avoid making a difficult left turn.
- There is a lot to learn in each lesson, so your teen may need extra time to attain adequate skill proficiency. Mastery at each level is important before moving on to the next lesson.
- If possible, integrate night driving into each area of instruction.
Driving in the 21st Century
Improvements in auto and highway design also have increased highway safety. Many new cars are equipped with safety features that dictate basic vehicle control procedures. Drivers must understand these new technologies and the need for basic vehicle maintenance.
Tires, wheels, brakes, shock absorbers, drive train, steering and suspension systems function together to provide a safe, comfortable ride and good gas mileage.
Tires
Properly inflated tires are critical to vehicle control and good gas mileage. Tires should be inflated to the vehicle manufacturer’s recommended pressure printed on the vehicle’s door placard or in the owner’s manual, not the maximum limit listed on the tire sidewall. Under-inflated tires flex too much and build up heat, which can lead to blowouts or the tread separating and peeling off. The actual size of the tire patch in contact with the road is about the size of a dollar bill. These four dollar bill size patches of rubber in contact with the road surface allow the vehicle to respond to acceleration, braking, and steering. With this narrow margin of safety, it is important to check tire pressure at least once a month. Proper tire tread reduces traction loss on wet surfaces by channeling water through the tread. Government tire ratings are listed on the side of the tire. The “AA” rating is the top traction, speed, and load rating, and “C” is the lowest tire rating.
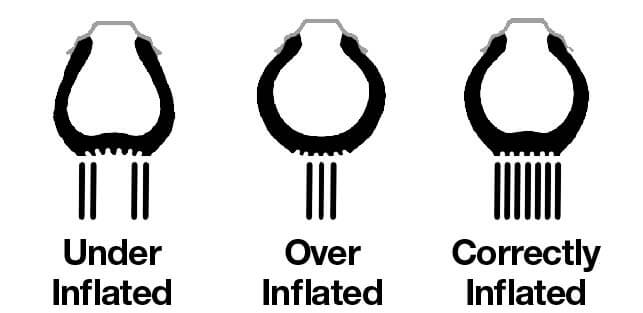
Prior to entering vehicle check tire pressure using recommended psi located in the door jam of the vehicle. Use a tire pressure gauge to check your psi. If your psi is above the number listed on your door jam, let air out until it matches. If below, add air (or have a retailer help you) until it reaches the proper number.
You may also measure tread depth using the penny test. Once every month, or before you embark upon a long road trip, check your tires for wear and damage problems. One easy way to check for wear is by using the penny test.
- Take a penny and hold Abraham Lincoln’s body between your thumb and forefinger.
- Select a point on your tire where the tread appears the lowest and place Lincoln’s head into one of the grooves.
- If any part of Lincoln’s head is covered by the tread, you’re driving with the legal and safe amount of tread. If your tread gets below that (approximately 2/32 of an inch), your car’s ability to grip the road in adverse conditions is greatly reduced.
Steering Control
Due to changes in steering ratios and effort needed to turn the wheel, steering control requires a balanced hand position on the lower half of the steering wheel.
Hand Position
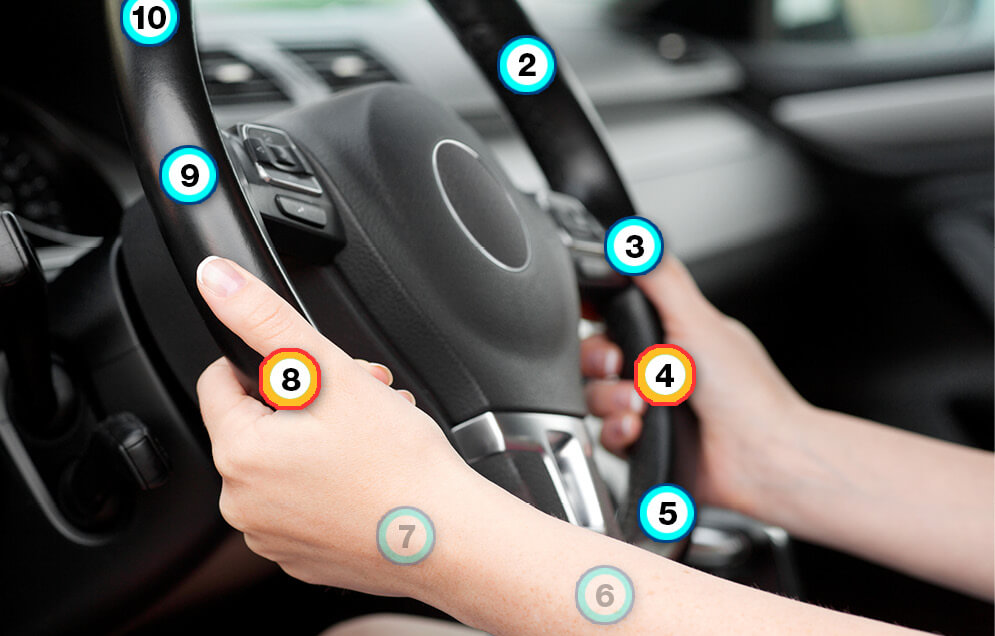
Good posture while driving is important because it allows a better view of hazards and more control of the vehicle. As a general rule, when gripping the steering wheel, place your left hand at the 9 o’clock position and your right hand at the 3 o’clock position on the wheel. Some manufacturers recommend placing your hands at 8 o’clock and 4 o’clock positions when the vehicle is equipped with steering wheel air bags. Check your owner’s manual or contact your vehicle manufacturer to determine which position is best for your vehicle. Always keep both hands on the wheel unless you are safely performing another driving-related task, such as activating your turn signal.
Steering—Hand-to-Hand/Push-Pull-Slide Steering
This steering technique keeps both hands on the wheel at all times and reduces excessive steering wheel movement. In the event of a frontal crash with a vehicle equipped with an air bag, this steering method also reduces the chance of injury because the arms do not cross over the steering wheel where the air bag is housed.
To push/pull steer:
- the right hand begins at 3 o’clock or below;
- the left hand begins at 9 o’clock or below;
- the right hand moves between the 5 and 2 o’clock position; and
- the left hand moves between the 7 and 10 o’clock positions.To reverse the push-pull-slide process, allow the steering wheel to slide through the hands until the vehicle’s wheels move to the straight-ahead position.
Hand-over-Hand Steering
In modern cars, this steering technique is used only when the vehicle is moving very slowly or is stopped, and the vehicle needs to be turned in a very sharp angle. For hand-over-hand steering:
- one hand grasps the wheel and pushes the wheel up, over, and down;
- at the same time the other hand releases the wheel and passes across the forearm to grip the wheel on the far side;
- this hand then pulls the side of the wheel up, over the top, and down; and
- these movements continue as long as necessary to turn the wheel as much as needed.
Brakes
Brakes play a vital role in your family’s safety when on the road. Brakes pads or shoes provide stopping power for your vehicle and should be in good working order. They usually last about 30,000 miles, depending on the driving conditions. Refer to the owner’s manual for recommended maintenance tips for your brakes.
Anti-lock Braking System (ABS)
Cars with anti-lock braking systems automatically check the system when the car is started. In order to stop suddenly in an ABS equipped vehicle, you must use firm brake pressure and maintain this pressure on the brake pedal even if you feel it pulsing or hear a grinding noise. The ABS system pulses the brake 15 times a second to avoid lockup and allows your wheels to keep rolling. Rolling wheels allow you to steer—you cannot change direction if your wheels are sliding. You and your teen should practice applying the hard braking mode in a vacant parking lot before having to use this crash-avoidance technology in a real emergency.
Air Bags
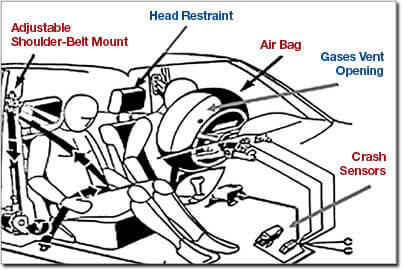
Driver and Front Passenger air bags are designed to inflate in a frontal impact. Drivers should sit at least 10 inches from the air bag because it inflates to six or seven inches in size at speeds up to 200 mph. Tilt the steering wheel as far down as comfortable to point at your chest, not at your face. Always wear a seat belt and secure children in the rear seat. To reduce forearm and hand injuries, hands should be placed on the lower half of the steering wheel, with knuckles on the outside and thumbs stretched along the rim of the wheel.
Side Impact air bags are designed to protect the torso and head in side impact crash. Care should be taken not to sit too close to the door or to lean towards the air bag.
Traction Control
Traction control systems monitor any difference in rotational speed between the front and rear wheels. This differential in wheel rotation may occur on uneven or slippery surfaces. When the system is activated, an automated combination of brake and/or engine control comes into play to provide controlled acceleration and tire traction.
Contemporary Mirror Setting
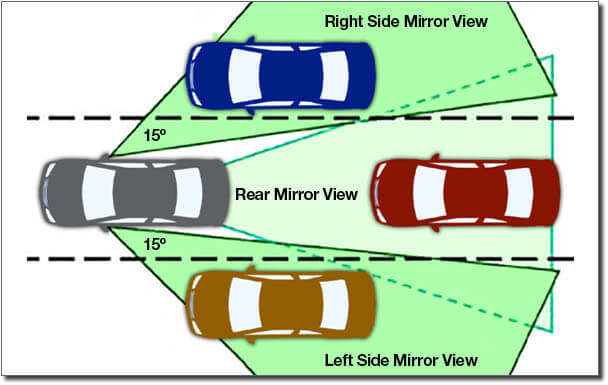
Adjust the inside mirror so that it frames the entire rear window and becomes the primary mirror for viewing what’s behind the vehicle. Adjust side mirrors to reduce the blind spot and headlight glare from the rear. Adjust the left side mirror by leaning your head towards the left side window, and set the left mirror so that the driver can barely see the side of the car. To adjust the right side mirror, lean to the right over the center console, and set the right mirror so the driver can barely see this side of the car. These adjustments provide a 15 degree viewing area to each side of the vehicle. This mirror setting reduces the overlap between the inside and sideview mirrors and allows the driver to monitor the adjacent lane. Traditional settings overlap with the rearview mirror view and should only be used if the view of the highway from the inside rearview mirror is blocked.
Backup Camera
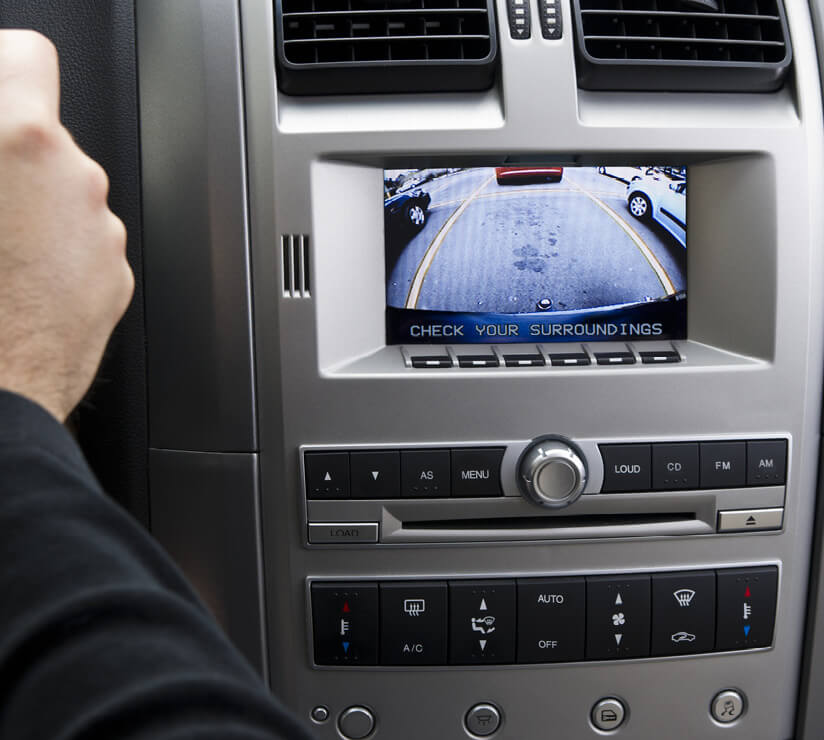
A rear view camera shows a simple video feed from a camera on the rear of the vehicle. Some systems also have overlay distance and trajectory lines to help the driver judge vehicle position. The back-up camera’s field of vision is directly behind the vehicle, and is at least 10 feet wide and 20 feet in length. Families touched by backover tragedies, especially those involving children, have pushed hard to require back-up cameras in all vehicles by 2018.
Tips for Driving in Adverse Conditions
Driver Inattention
Driver inattention is a primary cause of crashes. Distractions, such as interacting with passengers, texting/talking on the phone, or adjusting the radio, are especially dangerous for young drivers. Limit distractions by pulling off the road to perform activities not related to the driving task.
Drowsy Driving
Fatigue or drowsy driving severely limits your reaction time and decision-making ability, and is caused by lack of sleep, the body’s circadian rhythm, and driving for long periods of time. Circadian rhythm is the body’s natural “downtime”, which for most people is between 1 and 5 p.m. and around your normal bedtime. To avoid fatigue, take breaks, keep the vehicle cool, and be aware of your “downtime”.
Glare
Sources of glare include headlights of oncoming or following vehicles, misaligned headlights, improperly loaded vehicles, a dirty windshield, paper on the dashboard, facing the sun at dusk or dawn, snow-covered landscapes, and traditional versus contemporary side mirror settings. To combat glare, wear sunglasses during the day only, adjust sun visor as needed, keep windows clean, reduce speed, and look to the right-hand side of the road when meeting a vehicle with high beam headlights on.
Fog
During foggy conditions, reduce speed, use low beams, windshield wipers, and defroster/defogger and flashers if needed, and look for a safe area to pull off the road.
Heavy Smoke, Rain, or Snow
Reduce speed, turn on low-beam headlights, emergency flashers, and windshield wipers; make gentle steering, accelerating, or braking actions; be alert for stopped vehicles on the highway, and be prepared for wind gusts or strong steady crosswinds; turn on the radio to monitor weather and road conditions, and if possible, leave the highway.
Low Water Crossing
Nearly half of all flash flood fatalities are vehicle related. In severe rainstorms watch for flooding at bridges and low areas. Driving too fast through low water will cause the vehicle to hydroplane and lose contact with the road surface.
Hot or Cold Temperatures
Hot or cold temperatures place demands on tires, radiator coolant, hoses, connections, and drive belts and increase driving risks. Check these items prior to and after driving during these conditions.
Strong Wind
Strong wind conditions create a problem for drivers called buffeting. This occurs on bridges, through mountain passes and ravines, and when being passed by large trucks. Reduce speed, check traffic, be prepared to steer windward, and countersteer in the direction you want the vehicle to go.
Head-On Crashes
The possibility of serious injury or death is greater in a head-on crash. This type of crash is more likely to occur on two-lane highways, in narrow lanes or on curved roads, and in construction zones.
Rear-End Crashes
Rear-end crashes are one of the most common types of multiple-vehicle crashes. Tailgaters cause many rear-end crashes. Adverse conditions such as dense fog or smoke, heavy rain, and snow also increase risks to motorists because some drivers stop their vehicles while still on the highway.
Side-Impact Crashes
Most vehicles are not well-equipped to withstand a side impact. If your vehicle is in danger of being hit, your best option is to accelerate rather than apply brakes if the way ahead is clear.
Changing Traction Conditions
Traction or adhesion is the grip the tires have on the road surface, which allows the vehicle to start, stop, and/or change directions. As speed increases, traction between the tires and the road decreases. Three kinds of traction influence motor vehicle control: static, rolling (dynamic), and sliding. Road surface conditions that decrease the level of traction are ice, snow or frost, wet surfaces or standing water, mud or wet leaves, uneven surfaces, sand, gravel, and curves. Speed should be reduced in such conditions.
