
Vehicle Control Skills
The following section offers basic riding information on getting started, shifting gears, stopping, straight-line riding and turning. These basic skills are important to learn before moving onto more complex skills.
4.1 – Getting Started
Pre-trip Inspection – “TCLOCS
(TCLOCS is a Service Mark of MSF)
T = Tires and Wheels
- Air pressure
- Tread
- Cracks, dents, loose spokes
- Bearings
- Brakes
C = Controls
- Levers
- Switches
- Cables
- Hoses
- Throttle
L = Lights and Electrics
- Working condition
O = Oil and Other Fluids
(Coolant, hydraulic fluid, fuel)
- Levels
- Leaks
C = Chassis
- Suspension
- Drive components (chain, belt, or driveshaft)
S = Stands
- Side stand
- Center stand
Mounting the Motorcycle
To mount the motorcycle, stand on the left side of the motorcycle. Keep your eyes up toward the horizon. Grasp both handgrips, squeeze the front brake to keep the motorcycle from rolling, and swing your right leg over the seat. Sit and straighten the bike; raise the side stand with your foot.
Starting the Engine
- Turn the fuel valve (if equipped) and ignition switch ON.
- Shift to NEUTRAL. Do not rely on the indicator light. Rock the motorcycle back and forth without squeezing the clutch lever. If the motorcycle rolls freely, it’s in neutral.
- Turn the engine cut-off switch to ON.
- Turn the choke ON for cold starts. Many motorcycles require squeezing the clutch before the starter will operate. This is also a good precaution against accidentally starting the bike in gear and reduces the load on the starter motor.
- Press the starter button. Avoid using the throttle; the motorcycle should start without it. Many motorcycles have a safety mechanism that cuts power to the motor if the bike is placed in gear with the side stand down; so if you haven’t brought the side stand up, do it now. If the motor doesn’t start in the first 5 to 8 seconds, stop and repeat the steps above.
Stopping the Engine, Dismounting and Securing the Motorcycle
- Turn the engine cut-off switch to OFF. Turn the ignition OFF. Turn the fuel valve OFF if your motorcycle has one. Make sure all lights are off.
- To dismount, put the side stand down. Lean the motorcycle onto the side stand. While looking up and grasping both handgrips squeeze the front brake and swing your right leg over. Turn the handlebar fully toward the side stand for stability.
- After dismounting engage the fork lock or other security device, and then remove ignition key.
4.2 – Riding in a Straight Line
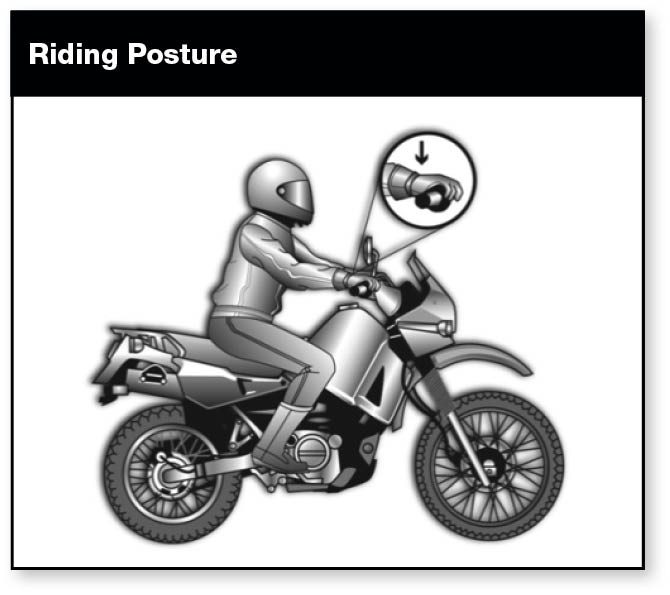
Riding Posture
To properly control a motorcycle:
-
- Posture – Keep your back straight and head and eyes up. Sit so you can use your arms to steer the motorcycle rather than to hold yourself up.
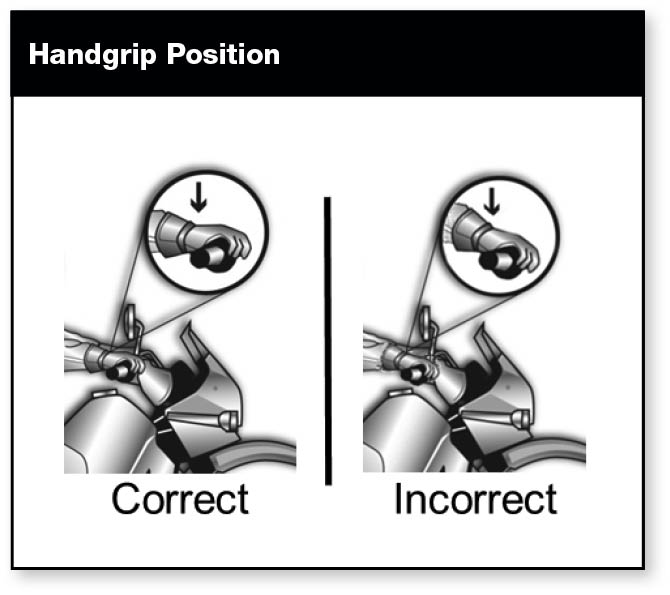
- Hands – Hold the handgrips firmly. Start with your right wrist flat. This will help you to control the throttle.
- Knees – Keep your knees close to the gas tank when the motorcycle is moving.
- Feet – Keep your feet on the footrests when the motorcycle is moving and avoid pointing your toes down. Keep your feet near the controls so you can easily and quickly use them.
Friction Zone
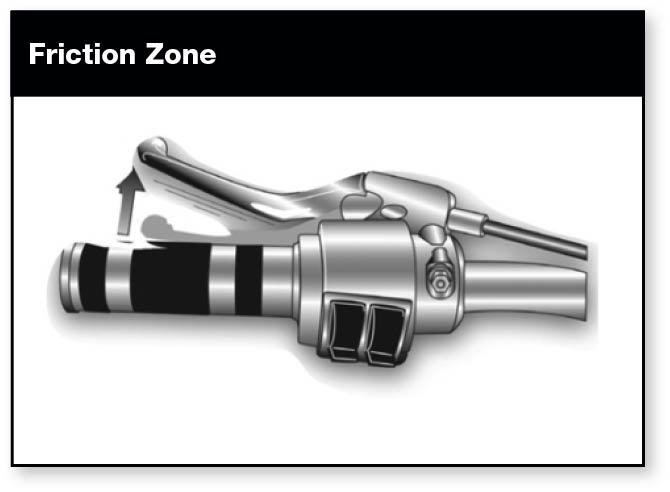
Since most motorcycles have a manual transmission, you will need to use the “friction zone” to start the motorcycle moving and to prevent stalling. The friction zone is the point on the clutch where the engine’s power begins to transmit to the rear wheel. As you reach the friction zone, roll on the throttle and the motorcycle will start moving forward. Do not fully release the clutch lever until your motorcycle is moving and stable.
4.3 – Shifting Gears
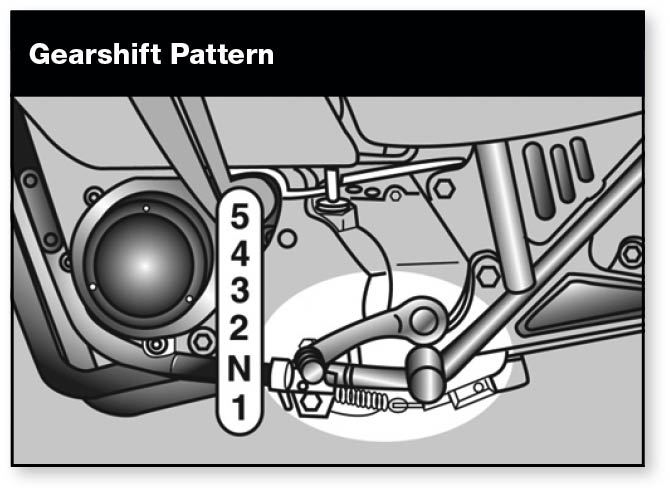
There is more to shifting gears than simply getting the motorcycle to pick up speed smoothly. Learning to use the gears when downshifting, turning, or starting on hills is important for safe motorcycle operation.
To upshift to a higher gear:
- Roll off or close the throttle as you squeeze in the clutch lever.
- Lift the shift lever. Use firm pressure. Release the shift lever after each shift is completed.
- Ease the clutch out as you roll on the throttle.
To downshift to a lower gear:
- Roll off or close the throttle as you squeeze in the clutch lever.
- Press down firmly (but don’t stomp) on the shift lever. Release the shift lever after completing the downshift.
- Ease the clutch out smoothly to avoid skidding the rear tire.
Starting on an Incline
Here are some important tips to remember when starting on a hill:
- Use the front brake to hold the motorcycle while you start the engine and shift into first gear.
- Change to the foot brake to hold the motorcycle while you operate the throttle with your right hand.
- Open the throttle a little bit for more power.
- Release the clutch gradually.
- Release the foot brake when the engine begins to slow down. This means the clutch is beginning to transmit power.
- Continue to release the clutch gradually. If you release it too quickly, the front wheel may come off the ground, the engine may stop, or both.
- Continue to open the throttle gradually, as needed.
It is more difficult to start the motorcycle moving on an upgrade than on flat ground. There is always the danger of rolling backwards into a vehicle behind you.
4.4 – Stopping
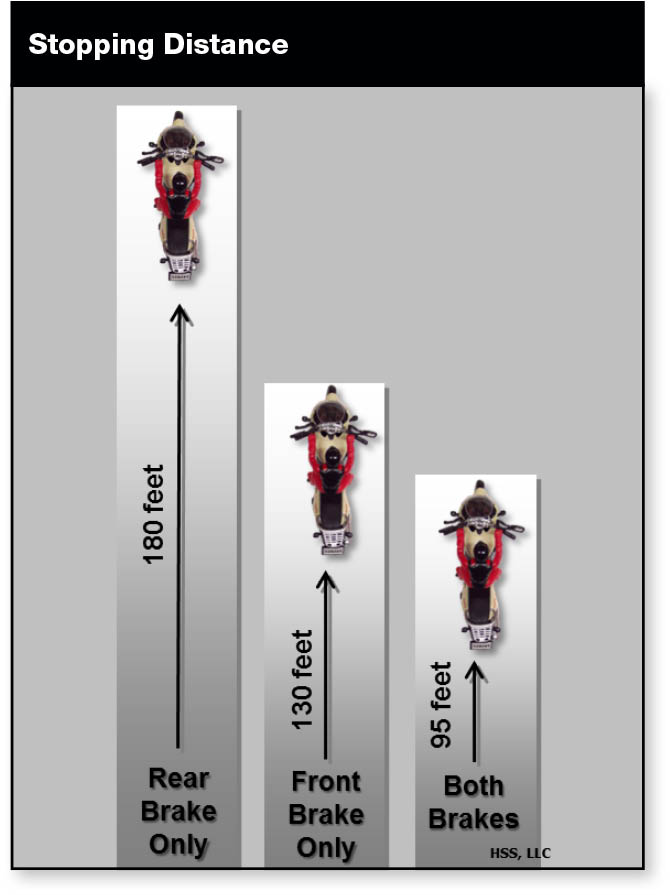
Your motorcycle has brakes on the front and rear wheels. Always use both brakes, every time you slow or stop. The front brake can provide 70% or more of your total stopping power, therefore, use of the front brake is required for effective speed reduction. Using both front and rear brakes shortens stopping distance.
To stop your motorcycle, squeeze the front brake and press down on the rear brake gradually until stopped. Grabbing at the front brake or jamming down on the rear can cause the brakes to lock, resulting in control problems.
Normal Stopping in a Curve
If you need to stop while leaned over in a curve, apply smooth gradual pressure to both brakes as you start reducing your lean angle. The more you reduce the lean, the more traction you will have to stop. You can apply more brake pressure as your motorcycle straightens up.
4.5 – Turning
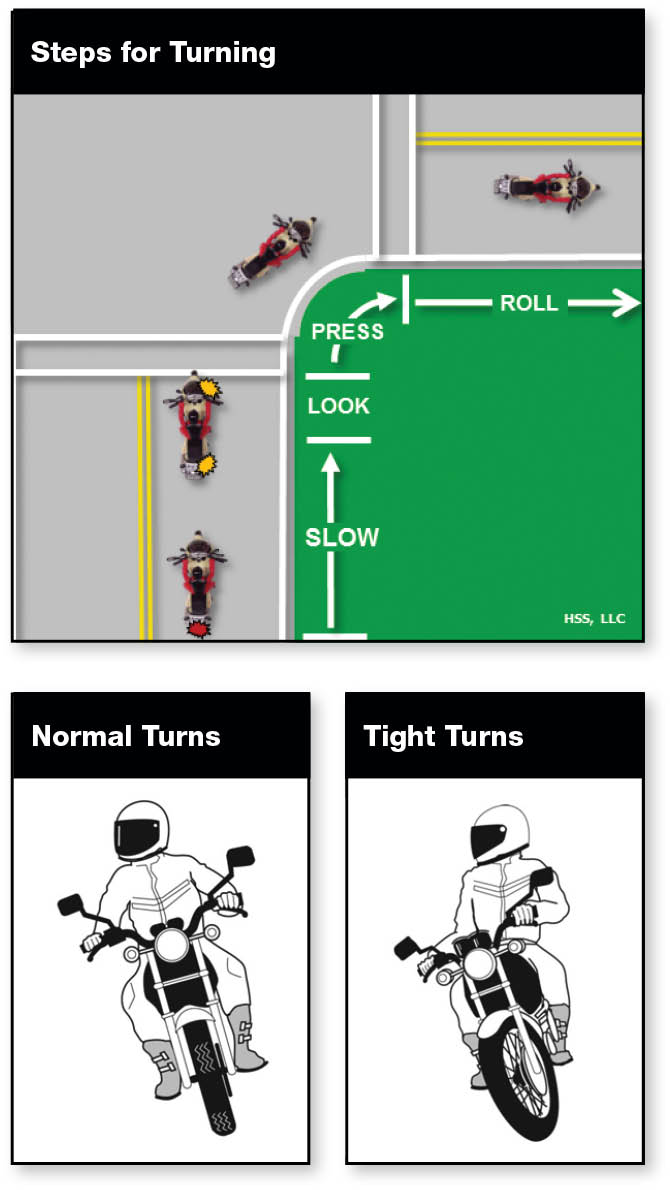
New riders must be aware of the difficulty of negotiating turns and curves. Riders often try to take curves or turns too fast. Reduce speed before entering the turn and maintain this speed. These four steps will help you learn the skills for turning:
- Slow – Reduce your speed before the turn. This can be done by rolling off the throttle as needed and, if necessary, applying both brakes.
- Look – Look through the turn to where you want to go. Turn just your head, not your shoulders, and keep your eyes level with the horizon.
- Press – Press forward on the handgrip in the direction of the turn. Press left handgrip forward– lean left – go left. Press right handgrip forward – lean right – go right. The higher the speed in a turn, the greater the lean angle.
- Roll – Roll on the throttle to maintain steady speed or gradually accelerate through the turn. This will help keep the motorcycle stable.
Turning Techniques
In normal turns, the rider and the motorcycle should lean together at the same angle.
In slow tight turns, counterbalance by leaning the motorcycle only and keeping your body straight.
Test Your Knowledge
1. When stopping, you should:
A. Use both brakes.
B. Use the front brake only.
C. Use the rear brake only.
2. When turning, you should:
A. Turn your head and shoulders to look through turns.
B. Turn just your head, not your shoulders to look through turns.
C. Keep your knees away from the gas tank.
1. A – Stopping
2. B – Turning