Railroad Crossings & Mountain Driving
Railroad-highway grade crossings are a special kind of intersection where the roadway crosses train tracks. These crossings are always dangerous. Every such crossing must be approached with the expectation that a train is coming.
2.15.1 – Types of Crossings
Passive Crossings. This type of crossing does not have any type of traffic control device. The decision to stop or proceed rests entirely in your hands. Passive crossings require you to recognize the crossing, search for any train using the tracks and decide if there is sufficient clear space to cross safely. Passive crossings have yellow circular advance warning signs, pavement markings and crossbucks to assist you in recognizing a crossing.
Active Crossings. This type of crossing has a traffic control device installed at the crossing to regulate traffic at the crossing. These active devices include flashing red lights, with or without bells and flashing red lights with bells and gates.
2.15.2 – Warning Signs and Devices
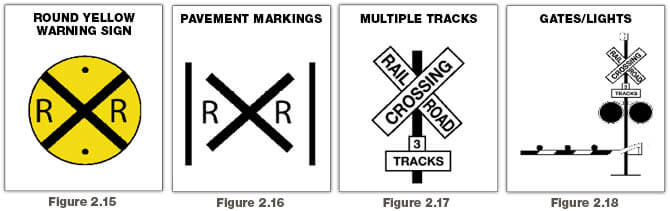
Advance Warning Signs. The round, black-on-yellow warning sign is placed ahead of a public railroad-highway crossing. The advance warning sign tells you to slow down, look and listen for the train, and be prepared to stop at the tracks if a train is coming. See Figure 2.15.
Pavement Markings. Pavement markings mean the same as the advance warning sign. They consist of an “X” with the letters “”RR” and a no-passing marking on two-lane roads. See Figure 2.16.
There is also a no passing zone sign on two-lane roads. There may be a white stop line painted on the pavement before the railroad tracks. The front of the school bus must remain behind this line while stopped at the crossing.
Crossbuck Signs. This sign marks the grade crossing. It requires you to yield the right-of-way to the train. If there is no white line painted on the pavement, you must stop the bus before the crossbuck sign. When the road crosses over more than one set of tracks, a sign below the crossbuck indicates the number of tracks. See Figure 2.17.
Flashing Red Light Signals. At many highway-rail grade crossings, the crossbuck sign has flashing red lights and bells. When the lights begin to flash, stop! A train is approaching. You are required to yield the right-of-way to the train. If there is more than one track, make sure all tracks are clear before crossing. See Figure 2.18.
Gates. Many railroad-highway crossings have gates with flashing red lights and bells. Stop when the lights begin to flash and before the gate lowers across the road lane. Remain stopped until the gates go up and the lights have stopped flashing. Proceed when it is safe. See Figure 2.18.
2.15.3 – Driving Procedures
Never Race a Train to a Crossing. Never attempt to race a train to a crossing. It is extremely difficult to judge the speed of an approaching train.
Reduce Speed. Speed must be reduced in accordance with your ability to see approaching trains in any direction, and speed must be held to a point which will permit you to stop short of the tracks in case a stop is necessary.
Don’t Expect to Hear a Train. Because of noise inside your vehicle, you cannot expect to hear the train horn until the train is dangerously close to the crossing.
Don’t Rely on Signals. You should not rely solely upon the presence of warning signals, gates, or flagmen to warn of the approach of trains. Be especially alert at crossings that do not have gates or flashing red light signals.
Double Tracks Require a Double Check. Remember that a train on one track may hide a train on the other track. Look both ways before crossing. After one train has cleared a crossing, be sure no other trains are near before starting across the tracks.
Yard Areas and Grade Crossings in Cities and Towns. Yard areas and grade crossings in cities and towns are just as dangerous as rural grade crossings. Approach them with as much caution.
2.15.4 – Stopping Safely at Railroad- highway Crossings
A full stop is required at grade crossings whenever:
- The nature of the cargo makes a stop mandatory under state or federal regulations.
- Such a stop is otherwise required by law.
When stopping be sure to:
- Check for traffic behind you while stopping gradually. Use a pullout lane, if available.
- Turn on your four-way emergency flashers.
2.15.5 – Crossing the Tracks
Railroad crossings with steep approaches can cause your unit to hang up on the tracks.
Never permit traffic conditions to trap you in a position where you have to stop on the tracks. Be sure you can get all the way across the tracks before you start across. It takes a typical tractor-trailer unit at least 14 seconds to clear a single track and more than 15 seconds to clear a double track.
Do not shift gears while crossing railroad tracks.
2.15.6 – Special Situations
Be Aware! These trailers can get stuck on raised crossings:
- Low slung units (lowboy, car carrier, moving van, possum-belly livestock trailer).
- Single-axle tractor pulling a long trailer with its landing gear set to accommodate a tandem-axle tractor.
If for any reason you get stuck on the tracks, get out of the vehicle and away from the tracks. Check signposts or signal housing at the crossing for emergency notification information. Call 911 or other emergency number. Give the location of the crossing using all identifiable landmarks, especially the DOT number, if posted.
2.16 – Mountain Driving
In mountain driving, gravity plays a major role. On any upgrade, gravity slows you down. The steeper the grade, the longer the grade, and/or the heavier the load–the more you will have to use lower gears to climb hills or mountains. In coming down long, steep downgrades, gravity causes the speed of your vehicle to increase. You must select an appropriate safe speed, then use a low gear, and proper braking techniques. You should plan ahead and obtain information about any long, steep grades along your planned route of travel. If possible, talk to other drivers who are familiar with the grades to find out what speeds are safe.
You must go slowly enough so your brakes can hold you back without getting too hot. If the brakes become too hot, they may start to “fade.” This means you have to apply them harder and harder to get the same stopping power. If you continue to use the brakes hard, they can keep fading until you cannot slow down or stop at all.
2.16.1 – Select a “Safe” Speed
Your most important consideration is to select a speed that is not too fast for the:
- Total weight of the vehicle and cargo.
- Length of the grade.
- Steepness of the grade.
- Road conditions.
- Weather.
If a speed limit is posted, or there is a sign indicating “Maximum Safe Speed,” never exceed the speed shown. Also, look for and heed warning signs indicating the length and steepness of the grade.
You must use the braking effect of the engine as the principal way of controlling your speed. The braking effect of the engine is greatest when it is near the governed rpms and the transmission is in the lower gears. Save your brakes so you will be able to slow or stop as required by road and traffic conditions.
2.16.2 – Select the Right Gear Before Starting Down the Grade
Shift the transmission to a low gear before starting down the grade. Do not try to downshift after your speed has already built up. You will not be able to shift into a lower gear. You may not even be able to get back into any gear and all engine braking effect will be lost. Forcing an automatic transmission into a lower gear at high speed could damage the transmission and also lead to loss of all engine braking effect.
With older trucks, a rule for choosing gears is to use the same gear going down a hill that you would need to climb the hill. However, new trucks have low friction parts and streamlined shapes for fuel economy. They may also have more powerful engines. This means they can go up hills in higher gears and have less friction and air drag to hold them back going down hills. For that reason, drivers of modern trucks may have to use lower gears going down a hill than would be required to go up the hill. You should know what is right for your vehicle.
2.16.3 – Brake Fading or Failure
Brakes are designed so brake shoes or pads rub against the brake drum or disks to slow the vehicle. Braking creates heat, but brakes are designed to take a lot of heat. However, brakes can fade or fail from excessive heat caused by using them too much and not relying on the engine braking effect.
Brake fade is also affected by adjustment. To safely control a vehicle, every brake must do its share of the work. Brakes out of adjustment will stop doing their share before those that are in adjustment. The other brakes can then overheat and fade, and there will not be enough braking available to control the vehicle. Brakes can get out of adjustment quickly, especially when they are used a lot; also, brake linings wear faster when they are hot. Therefore, brake adjustment must be checked frequently.
2.16.4 – Proper Braking Technique
Remember. The use of brakes on a long and/or steep downgrade is only a supplement to the braking effect of the engine. Once the vehicle is in the proper low gear, the following are the proper braking techniques:
- Apply the brakes just hard enough to feel a definite slowdown.
- When your speed has been reduced to approximately five mph below your “safe” speed, release the brakes. (This brake application should last for about three seconds.)
- When your speed has increased to your “safe” speed, repeat steps 1 and 2.
For example, if your “safe” speed is 40 mph, you would not apply the brakes until your speed reaches 40 mph. You now apply the brakes hard enough to gradually reduce your speed to 35 mph and then release the brakes. Repeat this as often as necessary until you have reached the end of the downgrade.
Escape ramps have been built on many steep mountain downgrades. Escape ramps are made to stop runaway vehicles safely without injuring drivers and passengers. Escape ramps use a long bed of loose, soft material to slow a runaway vehicle, sometimes in combination with an upgrade.
Know escape ramp locations on your route. Signs show drivers where ramp are located. Escape ramps save lives, equipment and cargo.
Test Your Knowledge
- What factors determine your selection of a “safe” speed when going down a long, steep downgrade?
- Why should you be in the proper gear before starting down a hill?
- Describe the proper braking technique when going down a long, steep downgrade.
- What type of vehicles can get stuck on a railroad-highway crossing?
- How long does it take for a typical tractor-trailer unit to clear a double track?
These questions may be on the test. If you can’t answer them all, re-read subsections 2.15 and 2.16