
Dual Air Brake
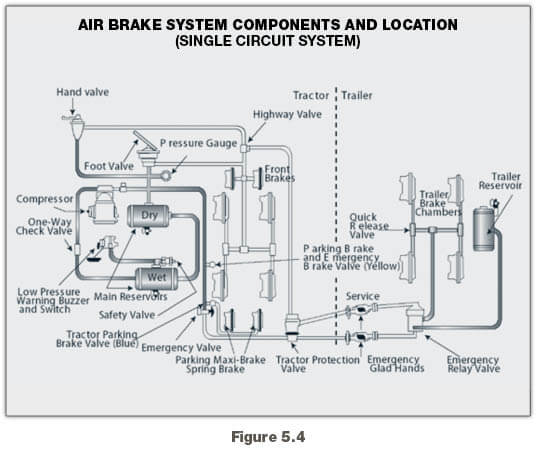
Most heavy-duty vehicles use dual air brake systems for safety. A dual air brake system has two separate air brake systems, which use a single set of brake controls. Each system has its own air tanks, hoses, lines, etc. One system typically operates the regular brakes on the rear axle or axles. The other system operates the regular brakes on the front axle (and possibly one rear axle). Both systems supply air to the trailer (if there is one). The first system is called the “primary” system. The other is called the “secondary” system. See Figure 5.4.
Before driving a vehicle with a dual air system, allow time for the air compressor to build up a minimum of 100 psi pressure in both the primary and secondary systems. Watch the primary and secondary air pressure gauges (or needles, if the system has two needles in one gauge). Pay attention to the low air pressure warning light and buzzer. The warning light and buzzer should shut off when air pressure in both systems rises to a value set by the manufacturer. This value must be greater than 60 psi.
The warning light and buzzer should come on before the air pressure drops below 60 psi in either system. If this happens while driving, you should stop right away and safely park the vehicle. If one air system is very low on pressure, either the front or the rear brakes will not be operating fully. This means it will take you longer to stop. Bring the vehicle to a safe stop, and have the air brakes system fixed.
5.3 – Inspecting Air Brake Systems
You should use the basic seven-step inspection procedure described in Section 2 to inspect your vehicle. There are more things to inspect on a vehicle with air brakes than one without them. These things are discussed below, in the order they fit into the seven-step method.
5.3.1 – During Step 2 Engine Compartment Checks
Check Air Compressor Drive Belt (if compressor is belt-driven). If the air compressor is belt-driven, check the condition and tightness of the belt. It should be in good condition.
5.3.2 – During Step 5 Walk-around Inspection
Check Slack Adjusters on S-cam Brakes. Park on level ground and chock the wheels to prevent the vehicle from moving. Release the parking brakes so you can move the slack adjusters. Use gloves and pull hard on each slack adjuster that you can reach. If a slack adjuster moves more than about one inch where the push rod attaches to it, it probably needs adjustment. Adjust it or have it adjusted. Vehicles with too much brake slack can be very hard to stop. Out-of-adjustment brakes are the most common problem found in roadside inspections. Be safe. Check the slack adjusters.
All vehicles built since 1994 have automatic slack adjustors. Even though automatic slack adjustors adjust themselves during full brake applications, they must be checked.
Automatic adjusters should not have to be manually adjusted except when performing maintenance on the brakes and during installation of the slack adjusters. In a vehicle equipped with automatic adjusters, when the pushrod stroke exceeds the legal brake adjustment limit, it is an indication that a mechanical problem exists in the adjuster itself, a problem with the related foundation brake components, or that the adjuster was improperly installed.
The manual adjustment of an automatic adjuster to bring a brake pushrod stroke within legal limits is generally masking a mechanical problem and is not fixing it. Further, routine adjustment of most automatic adjusters will likely result in premature wear of the adjuster itself. It is recommended that when brakes equipped with automatic adjusters are found to be out of adjustment, the driver take the vehicle to a repair facility as soon as possible to have the problem corrected. The manual adjustment of automatic slack adjusters is dangerous because it may give the driver a false sense of security regarding the effectiveness of the braking system.
The manual adjustment of an automatic adjuster should only be used as a temporary measure to correct the adjustment in an emergency situation as it is likely the brake will soon be back out of adjustment since this procedure usually does not fix the underlying adjustment problem.
(Note: Automatic slack adjusters are made by different manufacturers and do not all operate the same. Therefore, the specific manufacturer’s Service Manual should be consulted prior to troubleshooting a brake adjustment problem.)
Check Brake Drums (or Discs), Linings, and Hoses. Brake drums (or discs) must not have cracks longer than one half the width of the friction area. Linings (friction material) must not be loose or soaked with oil or grease. They must not be dangerously thin. Mechanical parts must be in place, not broken or missing. Check the air hoses connected to the brake chambers to make sure they aren’t cut or worn due to rubbing.
5.3.3 – Step 7 Final Air Brake Check
Do the following checks instead of the hydraulic brake check shown in Section 2, Step 7: Check Brake System.
Test Low Pressure Warning Signal. Shut the engine off when you have enough air pressure so that the low pressure warning signal is not on. Turn the electrical power on and step on and off the brake pedal to reduce air tank pressure. The low air pressure warning signal must come on before the pressure drops to less than 60 psi in the air tank (or tank with the lowest air pressure, in dual air systems). See Figure 5.5.

If the warning signal doesn’t work, you could lose air pressure and you would not know it. This could cause sudden emergency braking in a single-circuit air system. In dual systems the stopping distance will be increased. Only limited braking can be done before the spring brakes come on.
Check That Spring Brakes Come On Automatically. Continue to fan off the air pressure by stepping on and off the brake pedal to reduce tank pressure. The tractor protection valve and parking brake valve should close (pop out) on a tractor-trailer combination vehicle and the parking brake valve should close (pop out) on other combination and single vehicle types when the air pressure falls to the manufacturer’s specification (20 – 45 psi). This will cause the spring brakes to come on.
Check Rate of Air Pressure Buildup. When the engine is at operating rpms, the pressure should build from 85 to 100 psi within 45 seconds in dual air systems. (If the vehicle has larger than minimum air tanks, the buildup time can be longer and still be safe. Check the manufacturer’s specifications.) In single air systems (pre-1975), typical requirements are pressure buildup from 50 to 90 psi within 3 minutes with the engine at an idle speed of 600-900 rpms.
If air pressure does not build up fast enough, your pressure may drop too low during driving, requiring an emergency stop. Don’t drive until you get the problem fixed.
Test Air Leakage Rate. With a fully-charged air system (typically 125 psi), turn off the engine, release the parking brake, and time the air pressure drop. The loss rate should be less than two psi in one minute for single vehicles and less than three psi in one minute for combination vehicles. With the air pressure built up to governor cut off (120-140 psi), shut off the engine, chock your wheels (if necessary), release the parking brake (all vehicles), and the tractor protection valve (combination vehicle); and fully apply the foot brake. Hold the foot brake for one minute. After the initial pressure drop, if the air pressure falls more than three psi in one minute for single vehicles (more than four psi for combination vehicles), the air loss rate is too much. Check for air leaks and fix before driving the vehicle. Otherwise, you could lose your brakes while driving.
Check Air Compressor Governor Cut-in and Cut-out Pressures. Pumping by the air compressor should start at about 100 psi and stop at about 125 psi. (Check manufacturer’s specifications.) Run the engine at a fast idle. The air governor should cut-out the air compressor at about the manufacturer’s specified pressure. The air pressure shown by your gauge(s) will stop rising. With the engine idling, step on and off the brake to reduce the air tank pressure. The compressor should cut-in at about the manufacturer’s specified cut-in pressure. The pressure should begin to rise.
If the air governor does not work as described above, it may need to be fixed. A governor that does not work properly may not keep enough air pressure for safe driving.
Test Parking Brake. Stop the vehicle, put the parking brake on, and gently pull against it in a low gear to test that the parking brake will hold.
Test Service Brakes. Wait for normal air pressure, release the parking brake, move the vehicle forward slowly (about five mph), and apply the brakes firmly using the brake pedal. Note any vehicle “pulling” to one side, unusual feel, or delayed stopping action.
This test may show you problems, which you otherwise wouldn’t know about until you needed the brakes on the road.
Test Your Knowledge
- What is a dual air brake system?
- What are the slack adjusters?
- How can you check slack adjusters?
- How can you test the low pressure warning signal?
- How can you check that the spring brakes come on automatically?
- What are the maximum leakage rates?
These questions may be on your test. If you can’t answer them all, re-read subsections 5.2 and 5.3.